
by Richard Wheelband, UOSH Midlands Digitisation Engineer
The Unlocking Our Digital Heritage (UOSH) Midlands Hub is based in Special Collections at the University of Leicester and is preserving ‘at risk’ sound collections from across the Midlands. This is the story of one of the collections.
In mid-2019 project manager Colin Hyde and I visited Coventry Archives to collect their general oral history collection. This was recorded in Coventry around the mid to late eighties and covers many aspects of life in Coventry. It consists of 264 ¼ inch open reel tapes. The reel size of all the tapes is 5 inch/12cm and the tape brand is Ampex.
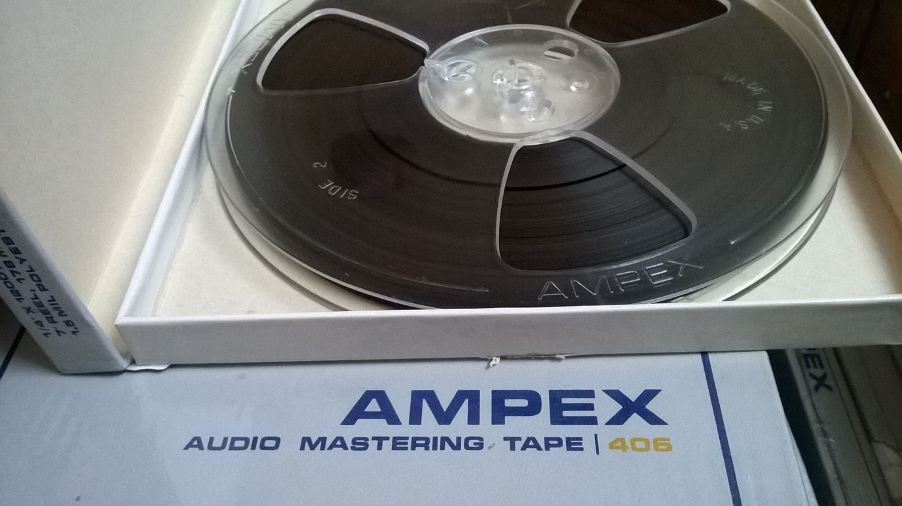
One of the tapes from the oral history collection
The collection is stored in archival boxes and in the original cardboard packaging. Some of the tapes were still in the plastic bags they originally came in and we needed to remove these (with the permission of the collection holders). Plastic bags can hold moisture, restrict air flow, harbour mould and in some cases give off gas, all of which can damage the audio tape. Mould is a potential health risk to deal with and requires the correct Personal Protective Equipment (PPE).
Once unloaded at Special Collections we carried out a condition survey, which means that we checked every tape before we put the collection in the archive store. The tape reels were in very good condition and were dust, dirt and mould free, so our cataloguer proceeded to give each tape a unique identifier, called a shelf mark, and recorded it on our tracking spreadsheet.
Preparation
Before we play and digitise an open reel tape, we inspect it to see if it has leader tape, if the tape is nice and tight and uniform on the reel, and if it is in good condition. We do this by manually handling the reel and feeling if the tape is loose or tight. If you play a tape reel with a loose tape pack, you run the risk of the tape machine speeding up really fast to take up the slack. When friction builds up and the tape bites, the force pulls hard on the tape and stretches it, which is disastrous as you lose all timing information and signal strength, irreversibly damaging and erasing the audio on the tape.
To avoid damage, we put the tape on the machine and, gently by hand, take up the slack by holding the end of the tape in the right hand and winding the reel clockwise with the left hand. At this point we add, if needed, leader tape, which is a coloured plastic tape that has no magnetic recording material on it. It is used to add excess tape to span the gap of the tape machine’s hubs and tape path; without it, or with too little leader tape, you wouldn’t be able to play the audio tape completely from beginning to end as the tape would fall away from the tape heads at the end of the tape and at the beginning – it would miss the audio and, potentially, the machine wouldn’t be at a stable speed.
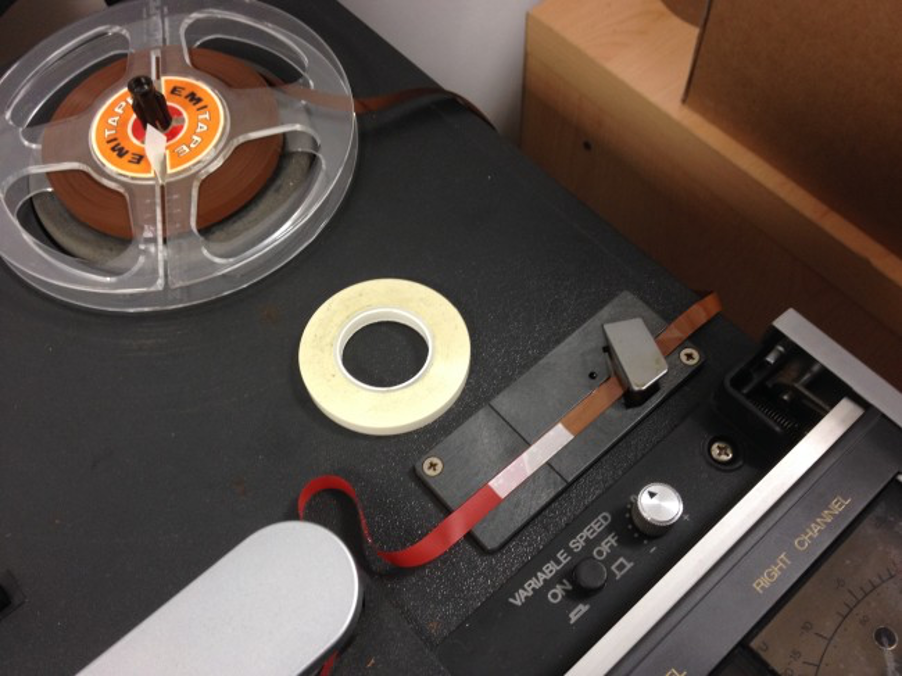
Tape (brown) and leader tape (red) on an editing block with the adhesive tape (yellow) that is used to stick them together
Once we have added leader tape to the beginning of the tape and taken up the slack, we lace the tape on the machine and perform a ‘library wind’, which is a more gentle and slower fast forward setting than usual. When the tape reaches the end, we add leader tape if needed. The library wind is useful for showing up old failing edit points where the broken-down sticky tape comes apart. This is easily fixed with a bit of cleaning and new sticky tape.
With the Coventry Archives tapes, whilst performing a few library winds it showed that the tapes were depositing a black waxy substance all over the tape heads (see example below). This meant that the tapes had some sort of sticky shed syndrome (SSS).
SSS will hinder play back by a reduction in high frequencies and a squeaking distortion. Eventually the build-up of shed on the tape heads and path will cause high tension on the tape and the tape machine will stop. To remedy SSS we baked every tape from the collection the day before transfer at 55C for 12 hours to dehydrate the tape in a slow and gentle manner. We did this by placing six tapes at a time in a standard food dehydrator used for drying fruit and making beef jerky. With SSS it is best to do the library wind repack after baking as it saves time and damage to the tape because you are not constantly having to clean the shed deposits off the tape machine.
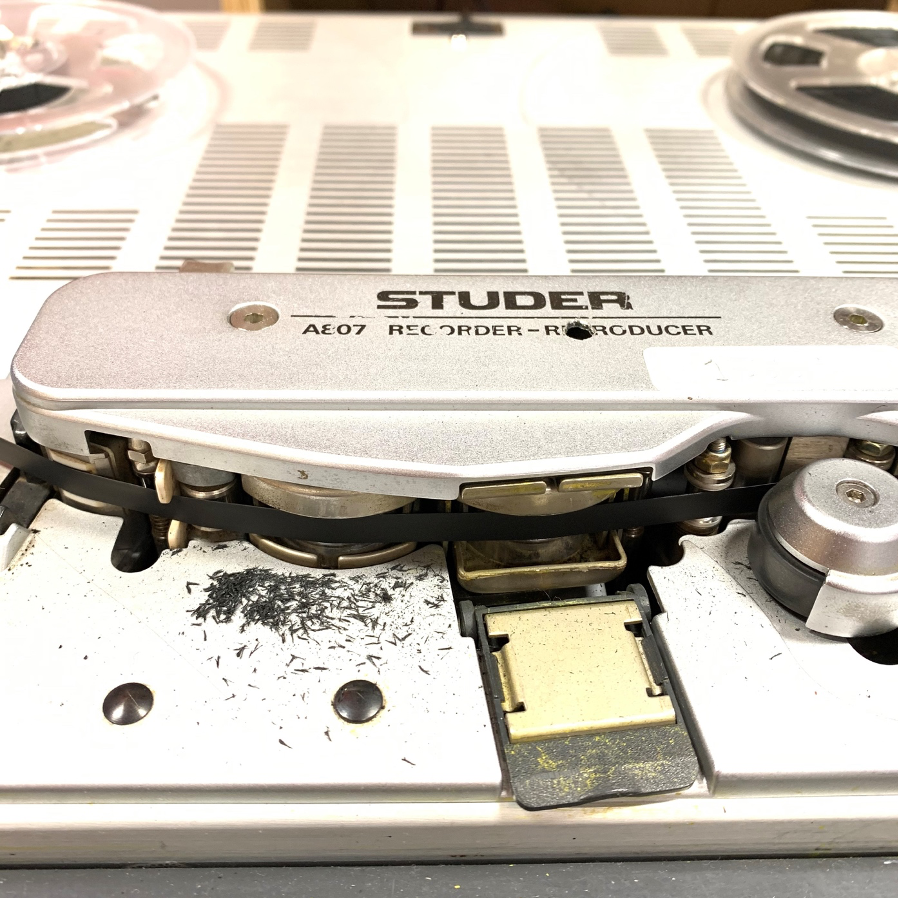
An example of the residue left on a tape player from sticky tape syndrome
Capture
The day after baking a batch of tapes, I would do the library wind repack, add leader tape, and prepare the tape machines for transferring the baked tapes. The first step is to demagnetise the tape heads and tape path by pulling a demagnetiser through the tape path, across the tape heads, and away from the machine a few times. The tape machine must be switched off for this as it could damage the electronics if the machine was on. The demagnetiser, when switched on, creates a strong pulsing magnetic field so it is very important to keep it away from tapes and anything else that might be affected by magnetism.
The next step is to clean the tape heads and path with cotton swabs and 99% pure isopropyl alcohol by wetting the swab and scrubbing everywhere on the tape machine where the tape comes into contact. Isopropyl alcohol is a fast-drying solvent that leaves little to no residue (but is highly flammable, so be careful when using it).
Now the machine is clean it is ready for the tape transfer. We lace the tape onto the machine, wrap the tape onto the take up reel on the right side of the machine and set the counter to zero. We play the tape and adjust the position of the play head with an adjustment screw on the headblock. This gently rocks the play head from side to side and the goal is to match the play head angle with the angle of the original tape recorder’s record head.
This is called ‘setting the azimuth’ (the azimuth is the angle of the tape head to the tape) and can sometimes be done with a phase scope on a computer, but the most reliable way it to listen to the audio as you adjust the tape head and look out for a change in the frequency content of the audio; if the audio goes dull, change the direction of the adjustment screw and you should notice the high frequencies will return. With a bit of back and forth the optimum azimuth setting can be achieved.
If all the tapes from a collection were recorded on the same tape machine the azimuth doesn’t change that much, but you still have to check and set it for every tape. Check more than one place on the tape so you know that the azimuth adjustment is consistent and optimal throughout the whole of the tape.
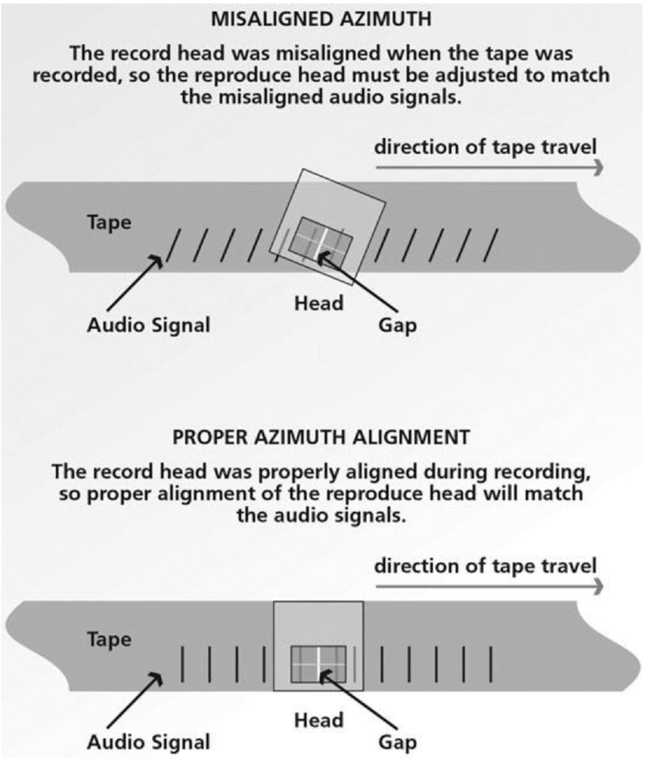
Diagram showing examples of azimuth adjustment
Digitising or recording the tape involves an audio interface, PC and digital audio workstation (DAW) software. An audio interface is a piece of equipment that converts the tape player’s analogue signal into a digital signal for the PC. We use a Prism analogue to digital (AD) converter, a standard PC running Windows 10, and Wavelab 10 software (there are many different ways of setting up a DAW).
The transfers are carried out at the archival standard and format of 24bit .wav files at a sample rate of 96Khz. The professional Studer A810 tape machines that we use are calibrated and have fixed output levels, so there is no need to set any gain levels for the tape on the audio interface. We give the recording track the same unique shelf mark name as the tape. Once the recording has started we listen to the transfer to make sure there are no problems and that the baking processes have worked.
Once the recording has finished, we do an error check (called a checksum) on the audio file and, if it is a pass, we edit the file to remove silence and give the file name extra information to represent the physical item and the audio content.
For example, the file name might go as follows UUOL020-1_s1_f1_v1,
UUOL = University of Leicester
020 = collection number 20
020-1 = item 1 of collection 20 (item could be tape, CD, minidisc etc.)
S1 = side one
F1 = file one (for each technical change, such as if the recording changes from mono to stereo at some point, we create a separate file)
V1 = version one (occasionally there are multiple versions that use different settings)
When the transfer and naming is completed the audio can be listened to by the cataloguers in preparation for the audio and metadata being submitted to the British Library. The cataloguers also create summaries and check existing paperwork. When the cataloguers have sent this information to the British Library the audio file can be sent and married up with the records and transfer technical metadata (which machines were used, which settings etc.) in preparation for the British Library universal audio player. This whole process will make it easier for researchers, local historians, and families to search for people, historical events, places and subjects, and hear the voices of people who have first or second hand experiences of a wide variety of subjects.
The Coventry Archive oral history collection is amazing. It features a broad range of subjects such as engineering, the car industry, armaments, aerospace, as well as stories of Coventry life and people, and the lives and experiences of people that came from all around the UK and other parts of the world to work in Coventry.
One of my favourite recordings from the collection is UUOL020/214-215, recorded in 1987, which tells the life story of Mrs J Olinkiewicz who recounts her memories, as a little girl, of the Russian invasion of Poland in WW2, losing the family home, and the story of her and her family being sent to a Siberian Gulag. The tape tells of lots of loss and hardship, but Mrs Olinkiewicz talks about her mother with happiness; she must have been incredibly mentally and physically strong to have ensured Mrs Olinkiewicz’s survival. This is but one of the many historical events told from first hand experience in this oral history collection. It is a rich source of information and I feel extremely lucky to have been part of the digitisation and preservation process.
Richard Wheelband
UOSH

 Subscribe to Colin Hyde's posts
Recent Comments